Wednesday, December 26, 2012

Entertainment Center

We recently moved into a new house and we had this ginormous alcove (8ft tall by 8feet 8 inches wide and 2 feet deep) that was just sitting lonely, awaiting a transformation!  I talked my husband into creating an entertainment center for me so that I had shelves to display pictures of my family and friends and a place for the tv to sit up high so that my toddler's fingerprints would stay off of it! 

We used prefab kitchen cabinets that we purchased at Home Depot...


Placed them into the alcove, and built bookshelves and a unit to surround our television.


My husband put cabinet lighting in too (they are not mounted to the top of the shelves yet, but you get the idea!)


My husband got the AWESOME idea to put hinges on the faux cabinet in front.... we built a shelf inside and put our dvd and dvr inside of it.  We open it when we are watching TV and close it when not in use so little fingers are not playing with the electronics!


Here it is once I painted it!
Isn't it beautiful!?!  I still need to do the moulding at the bottom and add a picture with the cabinet doors too!


Amy Butler Bag

I made this adorable bag for my SLP aide Tara!
(I've renamed it the "Mom bag" because it;s a perfect size for toting around all those mommy necessities!)
I love the fabrics!  Although kinda time consuming (probably because I never get to sit down with two kids and finish anything!), it was easy and fun to make! :)


Monday, December 10, 2012

Christmas Wall Hanging

Well, I had originally made this for a gift exchange, but loved it too much and decided to keep it for myself... that's okay, right?!?  ;)
It's in the process of being quilted and bound and then I'll post the finished product!  This was made from scraps! Love using up those scraps!

Okay... Its done!  And, I love it!


Corinne's Christmas Gift

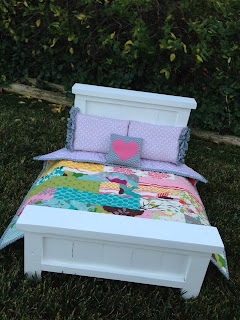
My four year old asked Santa for the Caroline American Girl Doll for Christmas.... I couldn't let such a beautiful doll sleep on the floor or with a recycled baby blanket! 
 I found a tutorial for an ADORABLE bed on http://ana-white.com/ and had to make it for her baby doll!
I love the way it turned out!


The quilt was made from fabric scraps of a previous quilt that I made for Corinne.  How cute will it be for "Caroline" and Corinne to have matching quilts?!?


 The pillows are stuffed with folded up batting that was cut off the edges of another quilt!  I love how the quilt is reversible and coordinates with the mattress (covered piece of 1" thick foam).

 This picture doesn't really do the beautiful quilting justice, but I was just too excited and had to share this tonight!  I'll post more pictures soon!  Thanks Mom for once again for the beautiful quilting! 
You ROCK!


Thursday, December 6, 2012

Pinwheels!

This quilt was one that I completed as part of a "Dots and Stripes Challenge" in my quilting group!  I had TONS of small scraps of fabric that I just had to use, plus a really unique (and unmatching!) set of dots and stripes fabric that I was required to put together in quilt.. The result is an adorable pinwheel quilt! 
I know I could've probably challenged myself a little more here but wanted this to serve as a cute quilt for my kiddos (borders match their playroom fabrics), use up scraps, and use my dots and stripes all in one quilt!

My amazing Mom did the custom quilting on this bad boy!


I ended up not using the red border... just took away too much from the quilt itself!
More pictures of the quilting...


Just a few more pictures... I promise!


Lil' Twisters Christmas Tree Wall Hanging

Isn't this the cutest thing?!?  I've decided to make four of these for Christmas gifts this year! This one happens to be for my son and daughter's in home daycare providers.  A husband "Papa" and wife "Nonnie" couple in their 60's who have really become part of our family.  I made her a quilt last year and wanted to do something do decorate her home this year!


"Nonnie's Twister Tree"

I bought the Lil' Twister ruler, picked out some scrap squares and went to town! 
It's pretty simple to make, just time consuming!  After I decided how I wanted them to be laid out, I sewed them together.  The border goes on BEFORE you start cutting!

Here it is once it was cut with the Lil Twister tool and sewn back together again...

Auditioning borders... I love the way the green looks!


Here's another one that I made!